Last updated 15 / Apr / 2026
Introduction
This is the guide I use to set up a MAC from scratch for my work on programming, data science, machine learning, and artificial intelligence projects with Python. The process is divided into two main stages: first the base software development tools are installed, then the specific tools for Python development.
1. Install BREW
Homebrew is the package manager for macOS. It allows you to install, update, and uninstall software from the terminal easily.
Open the Terminal and run the following commands:
xcode-select --install
/bin/bash -c "$(curl -fsSL https://raw.githubusercontent.com/Homebrew/install/HEAD/install.sh)"
The terminal will ask for your MAC password to complete the installation.
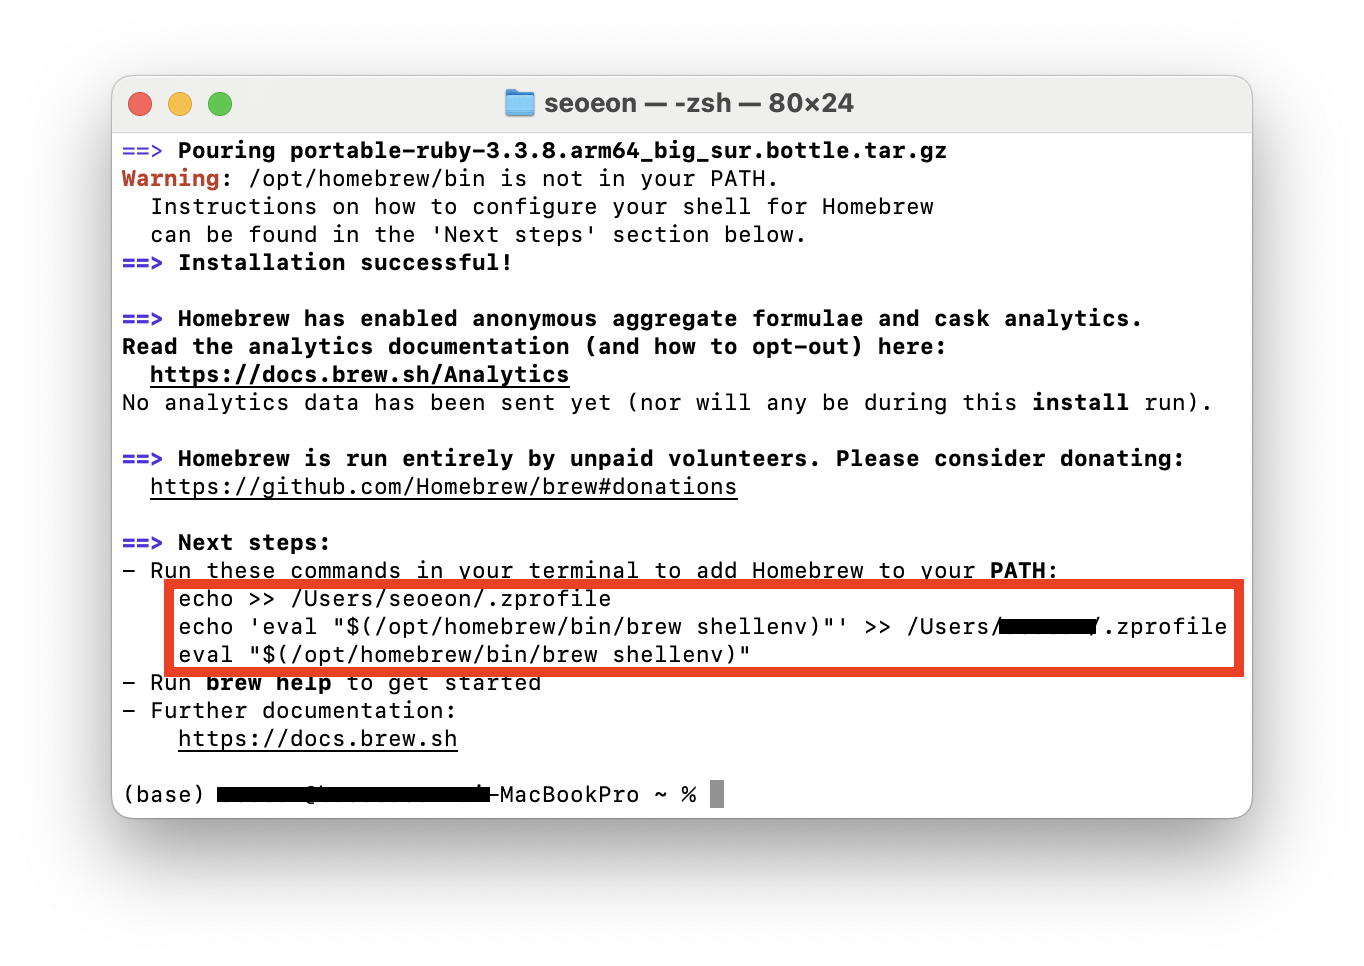
After the installation finishes, the installer displays a command that must be run to add brew to the PATH (so the terminal knows where the program is). This command is different on each MAC, so copy exactly what appears in your terminal (red box) and paste it to execute it.
2. Install Ghostty Terminal with Oh My Zsh
Ghostty is a fast, feature-rich, cross-platform terminal emulator that uses the native interface of each operating system and GPU acceleration. To see my Ghostty configuration and the tools I use in the terminal, check this link.
Oh My Zsh is a framework for managing Zsh configuration that adds themes, plugins, and autocompletion.
brew install --cask ghostty
To make Ghostty the default terminal, in the Ghostty top menu select Ghostty and then Make Ghostty the Default Terminal.
Install Oh My Zsh
Oh My Zsh enhances the terminal experience with themes, plugins, and advanced autocompletion:
Open a new terminal (open Ghostty) and install Oh My Zsh:
sh -c "$(curl -fsSL https://raw.githubusercontent.com/ohmyzsh/ohmyzsh/master/tools/install.sh)"
3. Install Python Development Tools
UV is a modern tool for managing Python versions, installing packages, and keeping them in isolated virtual environments per project.
brew update
brew install uv readline xz
Close the terminal with (⌘ + Q) and reopen it.
4. Install Python Versions
Install the Python version (or versions) that will be used in your projects. With UV you can install multiple versions without conflicts:
uv python install 3.12
uv python install 3.13
Close the terminal with ⌘ + Q, reopen it, and set the global default Python version (for example, Python 3.12):
uv python update-shell
uv python install --default 3.12
5. Configure Git
Git is the standard version control system for software development.
Close the terminal with ⌘ + Q, open Ghostty and run:
brew install git
Set the name and email that will appear in commits:
git config --global user.name "Your name"
git config --global user.email "myemail@emailhost.com"
git config --global color.ui auto
Run this command to avoid issues when installing pre-commit hooks in virtual environments:
git config --global --unset-all core.hooksPath
Base Applications
Base applications I use:
Visual Studio Code — code editor and Jupyter notebooks: Follow the instructions at https://code.visualstudio.com/docs/setup/mac
- VS Code Configuration
- To launch VS Code from the terminal, open VS Code ((
⌘ + shift + p)), typeShell Command: Install 'code' command in PATHand select that option. Now from the terminal you can open VS Code with thecode .command from any folder.
Rectangle — to organize windows on the screen:
brew install --cask rectangle
Free Up Disk Space
After several months of use, it is recommended to clean up disk space by running from the terminal:
Homebrew
brew autoremove && brew cleanup --prune=allUV
uv cache cleanPre-commit
pre-commit cleanDocker
docker system prune -a
If you use Hugging Face to download machine learning models, you can clear the cache for a specific model with:
Hugging Face
hf cache clear <model name>
If you use poetry to manage Python projects, it is recommended to migrate to UV. If you still use it, you can clean its cache with:
poetry cache clear --all ""